Vegans.UK

A place for Vegans to share!

  • Home
  • Restaurants
  • Easy Vegan Recipes
  • About

Cecina

March 10, 2017 by Tofu Temptress 4 Comments

...but normally I just plonk it on the plate!
Looks boring, tastes amazing

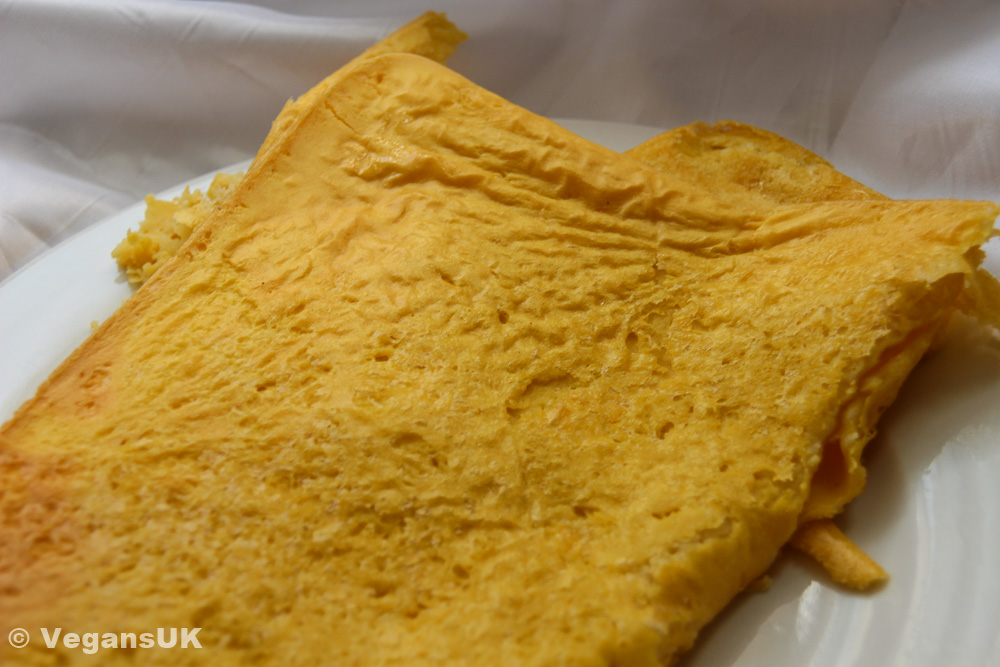
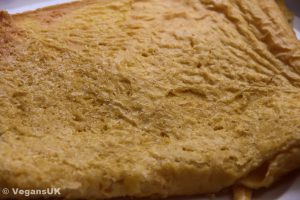
I’ll be honest and say that the yummy Italian dish cecina isn’t particularly visually arresting. In fact it looks quite boring. However, the taste is phenomenal. It’s amazing that such a simple, ordinary-looking dish with so few ingredients can be so wonderfully tasty.

It is normally served as a starter or side dish in Tuscany, but the quantities I’ve given provide two people with a hearty meal by itself. Obviously, feel free to cut the recipe in half or even into quarters to suit whatever portion size you’d like.


Ingredients

Sieving gram flour makes it easier to work with

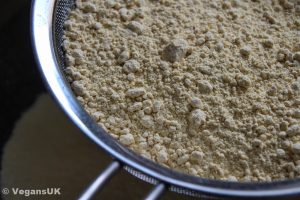
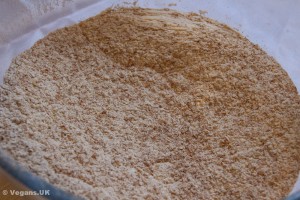
280g chickpea (gram) flour

1 litre water

60 ml olive oil

1 teaspoon salt

Ground pepper


Add water gradually, making a paste

Here’s how I do it:

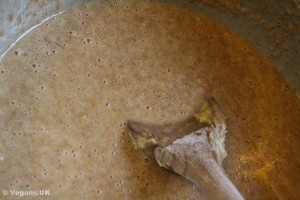
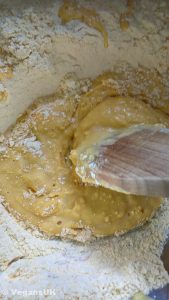
Firstly, sieve the flour into a large bowl. Gradually stir in the water, making it into a paste then a thinner batter. This way you can keep it relatively lump-free as opposed to adding the water all at once.

It'll be a thin batter once all the water's incorporated
It’ll be a thin batter once all the water’s incorporated

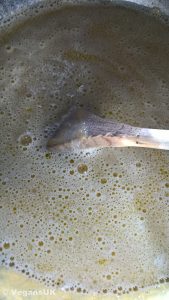
Once all the water is incorporated stir in the olive oil.

Finally, stir in the salt. Rest the batter for about thirty minutes.


Be careful not to spill the batter!

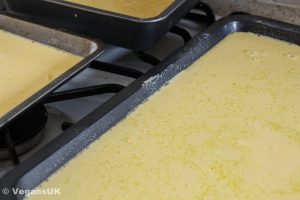
Preheat your oven to 375/190 degrees/gas mark 5. Prepare two medium or three smaller baking trays by spraying them with a little oil. (I use one tray 40cm X 25cm and two trays 20cm X 30cm.) Pour in the batter so that it covers the bottom of the trays, but not so full that it’ll spill when you carry them over to the oven!

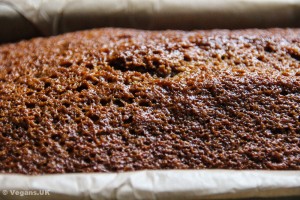
Pop them in the oven and bake until golden brown, which is usually about 20-25 minutes.

Let the cecina come away from the sides a little

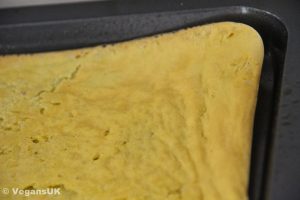
Take the trays out and leave them to cool for a couple of minutes so the cecina can come away from the sides a bit.

Ease the cecina out with a spatula onto a plate and grind some pepper over it to taste.

You can fancy it up a little...
You can fancy it up a little…

As I said before, normally it looks pretty boring, but I don’t mind as the taste is so good. However, if you’d like to pretty it up a bit, cut it into shapes with your most attractive cookie cutters – great for a dinner party.

...but normally I just plonk it on the plate!
…but normally I just plonk it on the plate!


Enjoy!


Filed Under: Easy Vegan Recipes Tagged With: chickpea flour, gram flour, Italian, Italy, simple, Tuscany

Spaghetti Bolognese

February 13, 2017 by Tofu Temptress 2 Comments

Tuck in!
I use wholemeal spaghetti

So, one of the easiest and most filling recipes I do is also one of the most flexible. I’ve written a basic recipe here, but you can experiment with different vegetables, or put in cooked lentils instead of soy mince, whatever you like. I hope it goes without saying that the level of seasoning and garlic are merely to my taste, so adjust those as you see fit too. This recipe feeds two hungry people, or more if you throw in a bit of bruschetta to start or something.

A super quick, easy, flexible recipe.
I find red onions more flavourful than white ones.

Ingredients

One small red onion

Soy mince is easy to get hold of in supermarkets.

3 cloves of garlic

One can of chopped tomatoes

1 cup soy mince

1 cup frozen mixed veg

Half a can of kidney beans

2 teaspoons oregano

Any small frozen veg will do.

2 teaspoons basil

Half a tablespoon of hot sauce

Tablespoon of ketchup

200g Spaghetti


Here’s how I do it:

Put a pan of water on to boil for the spaghetti and while that’s heating up, prepare your ingredients.

Fry the onion and garlic till softened.

Chop your onion into half moons and mince the garlic. Pop them into a frying pan with a few splashes of water and heat them gently.

Once your water’s boiling, put in the spaghetti and cook for ten minutes or whatever the package instructions say.

Empty the can of tomatoes into the frying pan and add the mince and frozen veg. Give it a good stir.

Cooking the veg and mince only takes a few minutes.

While that’s bubbling away, drain and wash your kidney beans using a sieve or colander and add them to the pan after a few minutes.

Add your oregano, basil, hot sauce and ketchup and stir again, making sure everything’s mixed well.

Pop the cooked spaghetti into warmed bowls.

Simmer away until your spaghetti is cooked. Drain the spaghetti and make sure it’s dried off before adding to warmed bowls.

Tuck in!
Tuck in!

Your bolognaise should be cooked by now, so spoon it over the top of the spaghetti.

Serve with cracked pepper and maybe a grating of vegan cheese. Enjoy!


Filed Under: Easy Vegan Recipes Tagged With: mince, pasta, recipe, recipes, spaghetti, tomato

Miso, veggie, tofu and noodle soup

November 5, 2015 by Tofu Temptress 1 Comment

Healthy, yummy, easy. Who could ask for more?

This soup is healthy, tasty, comes together in a short space of time and fills you right up. As the nights grow darker and often colder too, one’s mind naturally turns to comforting, warming soup. To be honest with you though, I make this at any time of year ’cause it’s so easy and yummy.

Tesco miso paste
Tesco miso paste

The miso paste I used for this was the stuff out of Tesco, but Sainsbury’s do a nice one and there are various brown rice misos you can get from health food shops. Whatever one you choose, the rule of thumb is generally one tablespoon of miso paste to 500ml liquid (in this case, vegetable stock). Have a play around with different ones and see which one you like best. Miso paste is generally with the Asian foods, or sometimes next to speciality ingredients in supermarkets.

Fancy barley miso from Clear Spring

You can also add any veg you like really – this is a really flexible recipe. Beansprouts would work well in place of noodles if that takes your fancy and really any green veg from cabbage to broccoli would be a winner here. Have fun!


Ingredients

2 tablespoons miso paste

1 red pepper, sliced thinly

1 onion, sliced into half moons (top and tail, cut onion down the centre, then slice up lengthways)

1 tablespoon of fresh ginger, chopped

Fresh ginger adds lots of great flavour

3 garlic cloves, minced

1-2 bunches of pak choi, roughly chopped

1 block of firm tofu

2 vegetable stock cubes (to make 1 litre of stock)

2 handfuls of mange tout

1 handful of kale

Blue Dragon soy sauce is clearly labelled

2 or 3 spring onions

A packet of flat rice noodles (2 servings)

3 tablespoons soy sauce


Here’s how I do it:

Spoon your miso paste into a large pot (one that can take at least a litre and a half, to cater for all your lovely chunky ingredients).

Pepper, onion and paste

Add the pepper and onion, garlic and ginger and put on to heat at a low temperature. Mix it all around and pop in the chopped stalks of pak choi (we’ll add the leaves a bit later.)

Ginger and garlic add great flavour

Pop your stock cubes into a measuring jug, boil a litre of water in a kettle and pour over to dissolve your two stock cubes. If the mixture in the pot is sizzling, just add a splash of your liquid.

Mix everything up well

While boiling and dissolving is going on, drain your tofu and press most of the moisture out of it over a sink. Transfer it to a chopping board and cube it with a sharp knife.

Cubed tofu
Cubed tofu

This is easily done. Just turn it on its long edge and cut down the middle. Now, lay it flat and cut four times lengthways and three times across.

Add stock
Add stock

Now it’s time to add the dissolved stock to the pot, along with the tofu. Add in the kale, mange tout, leftover pak choi leaves and spring onions at this point and give it all a good stir.


Add the other veg
Add the other veg

Give it five to ten minutes to let the veg soften and the tofu to absorb the flavours.

Finally, add the noodles

Add in the flat rice noodles (breaking them apart as you do so with your hands) and the soy sauce. This is the time to stir again and then give it a taste. (If it’s too salty for you, add some agave nectar or maple syrup if you have some and that should mellow it down.)

Leave for a bit so the flavours can be absorbed

Although the soup is now ready to serve, sometimes the flavours really start to come through after you’ve left it for a while, so this is a good one to make in advance. Also, the liquid can soak into the tofu and veg over time, so you may need to add a bit more stock/water when you heat it up after leaving it for a bit.

Marvelous miso!
Marvelous miso!


Enjoy!

Filed Under: Easy Vegan Recipes Tagged With: Asian, miso, noodles, soup, tofu, vegetables

Melting Moments

October 27, 2015 by Tofu Temptress 3 Comments

Eight melting moments
Melting moments
Melting moments

This is, hands down, the most indulgent thing I make. I mean, the sugar content is pretty much off the scale. However, if you’re looking to have an incredibly rich, biscuit-y, crumbly, crunchy treat that oozes smooth sweet filling as you bite into it, this may just be the recipe for you. You don’t have to put chocolate butter icing in the middle though (as I have). This recipe works just as well with any flavour of butter icing, or if you prefer, a thick jam will do the job nicely. Happy baking!

Ingredients

Cream the marg with icing sugar to start

200g vegan margarine

125g icing sugar

155g plain, white flour

85g cornflour

1/2 teaspoon baking powder

For the filling:

Add the flour mixture

100g vegan margarine

320g icing sugar

2 tablespoons cocoa

Some warm water, just in case


Here’s how I do it

Preheat your oven to 180 degrees or gas mark 4.

Cream the margarine and icing sugar together until they’re light and fluffy.

It will eventually form a dough

Sift in the flour, cornflour and baking powder and mix well. Now, as you’re mixing, it may begin to look a bit like crumbs, but that’s ok. It should eventually come together to form a dough, so keep going till it does. There’ll be a few crumby bits at the bottom of the bowl but not to worry.

Roll the dough into balls with your hands


Divide your dough evenly into 16 balls. I do this by roughly halving the dough in the bowl, then halving again so you have four blobs. Out of each of the blobs, make four balls by rolling the dough between your hands and placing on a baking tray that’s been sprayed with a bit of oil.

Flatten them with a fork

Once you’ve got your sixteen balls, gently flatten them off with a fork. Remember, the biscuits will spread and swell a bit while baking, so space them out with at least a couple of finger-widths between them.

Pop them in the oven to bake for 20 minutes.

They will expand when baked

Give them a minute or two out of the oven and then transfer them to a cooling rack.

Make the icing while the biscuits are cooling

(Start to make the icing and then they should be cool enough to sandwich together once you’ve done that.)

The amounts I’ve given should give you plenty of icing, so feel free to make a half to three quarters of the recipe if you don’t want to go mad.

Only add water a very little at a time

Cream the margarine and sugar together and then gradually add icing sugar. Pop the cocoa in at this point to if you’re using it. The icing should slowly come together as your beating it, but if it really is too stiff after a while, add half a tablespoon of warm water at a time until you get the consistency you want.

Make sure your icing is the right consistency

Be warned, icing can get too runny very quickly, so if this should happen, just pop a bit more icing sugar in to firm it up again. Beat the icing until there are no lumps and it is stiff enough to sandwich the biscuits together.

A generous blob of icing on each


Sort your biscuits into eight lots of two, trying to match similar sizes. With the best will in the world, they will not all be perfectly uniform in size, so just do your best.

Sandwich the biscuits together

Take the flatter one of each pair and put a generous dollop of icing (or jam, whatever you’re using) onto it, placing the other as a lid on top.

Repeat until you have eight melting moments.

The most indulgent treats
Melt into the moment...
Melt into the moment…
Have a sit down as you’re going to have the mother of all sugar rushes…

Filed Under: Easy Vegan Recipes Tagged With: baking, biscuits, chocolate, melting moments, recipe

Gingerbread

October 20, 2015 by Tofu Temptress Leave a Comment

Just out of the oven...
Aromatic gingerbread

An autumnal favourite, gingerbread is an easy, comforting treat to bake at this time of year and will make your kitchen smell fantastic. The best bit is that you probably have all the ingredients at home already.

This recipe is enough for TWO standard loaf tins, but you can do it in one 20cmX20cm cake tin if you like. If you’re feeling really indulgent you can cover your gingerbread with icing (when it’s cool!) and add some little bits of caramelised orange and lemon, but for this recipe, I’m just doing it straight up, as it were…

Ingredients

Vitalite is nice and soft and easy to cream

125g vegan marg such as Vitalite

100g caster sugar

350g golden syrup

75g applesauce

330g plain flour

1/4 teaspoon salt

1 1/2 teaspoons bicarbonate of soda

Loaf tin lined with paper

2 teaspoons ground ginger

2 teaspoons ground cinnamon

250ml water


Here’s how I do it:

Line your tin (or tins) with greaseproof paper and preset your oven to 180 degrees (slightly lower for a fan assisted oven) or gas mark 4.

Cream together marg and sugar

Cream the marg and sugar together in a bowl till they’re light and fluffy.

Heat the syrup in a pan gently until it’s runny, then add to the creamed mixture, mixing well.

Adding in the syrup to the creamed mixture


Once that’s incorporated, add your applesauce and mix again.

Sift the dry ingredients into a separate bowl

Sift the flour, salt, bicarb, ginger and cinnamon together into a separate bowl, then add them gradually to the mixture bit by bit alternating with adding the water. The resulting batter will be quite runny, but don’t worry, it’ll firm up nicely while baking.

The mixture is runny, but that's ok!
The mixture is runny, but that’s ok!


Pop the mixture into the tin (or divide it equally between loaf tins) and bake for 50 minutes. (Loafs should be ready 45-50 mins in, depending on your oven, while the cake tin may take up to an hour. Just keep an eye on things.) When you put a skewer in, it should come out dry. If it doesn’t, give it a few more minutes and try again.

Just out of the oven...
Just out of the oven…

When you take your gingerbread out of the oven, give it a good five minutes to reduce slightly before turning it out onto a cooling rack. Remove the paper, let it cool.


Let it cool completely if you're going to ice it
Let it cool completely if you’re going to ice it

(If you fancy doing a bit of decoration, go for it, but I prefer just to tuck straight in as it’s pretty sweet already.)

All that's missing is a cuppa
All that’s missing is a cuppa


Slice and serve!

Filed Under: Easy Vegan Recipes Tagged With: autumn, baking, cake, ginger, gingerbread, recipe

  • 1
  • 2
  • Next Page »

Sponsors:


Natural Collection - Ethical


Ethical Superstore

Advertisement

Cover for the first book by Heather Hamilton - Puppies for Sale.
Heather Hamilton - Puppies for Sale.


Cover for the book Forced to Run by Heather Hamilton, the cover has greyhound dogs running with an ominous Scottish mountain scene.
Heather Hamilton - Forced to Run.
Twitter: @VegansUK
Facebook: @VegansUK
Instagram: @Vegans.UK
  • Home
  • Restaurants
  • Easy Vegan Recipes
  • About

Copyright © 2025 · Modern Portfolio Pro Theme on Genesis Framework · WordPress · Log in

Vegans.UK Cookies Policy

Our Website uses cookies to improve your experience. Please visit our About page for more information about cookies and how we use them. To continue using the website you give consent to use cookies as mentioned on About.

Close